
Whether you have a bumper crop, found a great deal at the grocery store, or are just looking for a way to use up a watermelon before it goes bad, dehydrating watermelon is a great way to stretch out the life of any given melon and continue to enjoy it months past its expiration date! And learning how to dehydrate watermelon properly will help ensure you make the most out of the food you have on hand.

Read on to learn all about how to dehydrate watermelon, including the tools you need for the task, how to process and store your dehydrated watermelon, and so much more!
What Tools Do I Need to Dehydrate Watermelon?
As you learn how to dehydrate watermelon, you will quickly find that having the right tools truly makes or breaks the process. Like with many fruits, it comes as no surprise that there are a couple methods for how to dehydrate watermelon; however, there are a few tools that you will need regardless of which method you choose to pursue.
To prepare for how to dehydrate watermelon properly, you will need the following:
- A bread knife or other knife with a serrated edge
- A cutting board
- A colander or tea towel
- Parchment paper
- An airtight storage container or zip top bag.
If you are using a dehydrator, you will also need:
- A dehydrator
- Fruit leather trays specific to your dehydrator (in place of the colander or tea towel)
If you are using an oven, you will also need:
- A baking sheet
- A cooling rack
How to Pick Watermelons for Dehydrating

One of the key factors in how to dehydrate watermelon is to be picky about the fruit you start with! A watermelon that is underripe will still bring a lot to the table in terms of sweetness but will typically be more mealy and less flavorful, making for a dense, chewy watermelon that won’t be very tasty. In contrast, when you select a perfectly ripe watermelon, you will find that brings a great texture and a balanced watermelon flavor. The preferred texture for dehydrated watermelon will be typically like fruit leather or jerky when first dehydrated or brought out of storage, growing more taffy-like the longer it’s exposed to humid conditions.
In order to determine the appropriate ripeness in your selection of watermelon, you will want to look for two key factors. One is a medium or large yellow or brown spot somewhere on your watermelon; this shows where it was left on the ground to ripen, which indicates it was not picked too early!
You can also judge a watermelon’s ripeness by measuring the span of the deep green rings in certain multicolored varieties. A watermelon with darker green rings about the width of two fingers in size will typically be ripe.
How to Prepare Your Watermelons for Dehydrating

How to Process Your Watermelons
Now that you have selected your prize melon, it’s time to get down to the details of how to dehydrate watermelon!
To begin, you will want to cut your watermelon into slices. Any thickness from about 1/4th of an inch to ½ of an inch will do. Then, you will want to cut around the flesh and remove the rind; try to get your knife in as close to the rind as possible to minimize any wasted melon. This is what makes this step so involved, but so very important!
Now you can have a little bit of fun with the watermelon! Cut it into whatever shapes you prefer (while making sure they are relatively uniform). For example, if you are planning to make this a snack for toddlers or babies, you may want to cut the watermelon into shapes that are easy to grip and sizes that will allow little ones to gnaw on the sweet treat without worrying about choking hazards. For bigger kids and adults, you may want smaller, more standard shapes and possibly even bite-sized pieces that can fit easily into a lunchbox or some sort of snack container on the go.
Once you have processed the watermelon slices to your liking, it’s time to drain them out! You can either drain them in a colander (which will typically take longer as they are piled up together, preventing easy drainage) or place them on a tea towel or other kitchen towel to soak up the juices. In addition, if using a dehydrator tray or a cooling rack, you can place the watermelon slices on the trays or rack over a towel or over your sink and allow them to drain that way.
Once your watermelon slices have drained for about 15 to 30 minutes, it’s time to dive into the actual steps for how to dehydrate watermelon!
How to Dehydrate Watermelon in a Dehydrator
When it comes to learning how to dehydrate watermelon in a dehydrator, you will be pleased to know this is a very straightforward process: you can simply arrange your watermelon shapes on dehydrator trays (parchment paper is optional here, but recommended to reduce the risk of sticking) and place them in the dehydrator.
Typically you will want to dry them at around 135 degrees for anywhere between 8 to 18 hours, flipping them after 5 hours to keep them from getting stuck to the paper or tray (note that this timing and the heat level may vary based on your dehydrator’s settings and the texture you desire for your watermelon slices. You may have to experiment with a couple rounds to find the settings and timeframe that are perfect for your dehydrator).
Keep an eye on the watermelon slices and look for there to be no more stickiness; once a dry, leathery texture with no residual stickiness is achieved, your watermelon is properly dehydrated!
How to Dehydrate Watermelon in an Oven
When it comes to figuring out how to dehydrate watermelon in an oven, this process is thankfully not too much more labor-intensive than the use of a dehydrator—but it can be more time-consuming!
First, you will want to follow the same preparatory steps listed above. Then, once your watermelon slices are drained, arrange them on a cooling rack placed over a cookie sheet, which will keep them from drying out too much on the bottom.
Place the cookie sheet with its cooling rack full of watermelon slices into the oven and dry at a temperature between 140 and 170 degrees (or to its lowest setting with the door cracked if it will not reach below 170 degrees, but be mindful for pets and children in the area of the stove) for roughly 4 to 6 hours, turning about halfway through the time to prevent sticking.
Because dehydration is not the typical use of an oven, you will want to keep a close eye on your watermelon slices to ensure they are not burning. And, similar to working with a dehydrator, you may need to tweak the temperature and time ranges for your specific oven to ensure the desired outcome is achieved. Some ovens require closer to 10 to 12 hours to dehydrate properly, so be sure to set aside a good block of time when you are first experimenting with oven dehydration to ensure you can achieve the proper dehydration levels!
How to Store Dehydrated Watermelon
Now that your watermelon is dehydrated, you have the option to enjoy your delicious snack immediately, or to store it.
Dehydrated watermelon will keep in an airtight container for up to 6 months, and an airtight container such as a glass or plastic Tupperware bowl or an airtight zip-top bag will do the trick. If stored, it’s recommended to wrap the individual pieces in parchment or wax to keep them separate from each other.
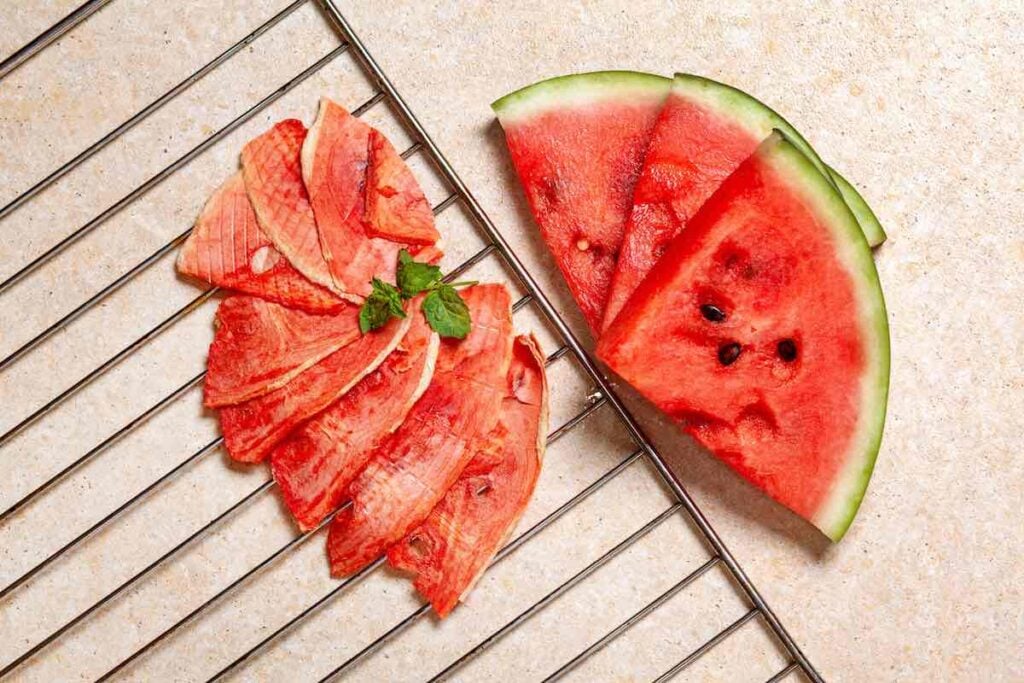
Whether you are eating them immediately or after some time in storage, you can enjoy these dehydrated watermelon pieces with a little bit of salt, lime juice, or mint!
Wrapping Up How to Dehydrate Watermelon
Feeling confident about how to dehydrate watermelon? Want to learn more about this iconic summer fruit? Then visit our watermelon plants page to learn more about watermelon planting, growing, cooking, and more!
- About the Author
- Latest Posts

Renee Dugan is a lifelong writer, professional editor, and lover of all things nature, gardening and the big outdoors.
A Midwest girl who’s been in the garden since she could first hold a hand trowel, Renee’s love of growing things has bloomed into a passion for healthy living, holistic lifestyle, and knowing where our food comes from.
Now a mother and maturing gardener herself, Renee is passionate about channeling everything she knows and continues to learn about gardening into lessons for her son and others. Her excitement for sharing this knowledge is only superseded by her excitement about being able to finally grow her own citrus plants in pots.
Renee can be reached at renee.s.dugan@gmail.com